
Items sold through FlexiPOS must be created, edited and managed through the Supplier Portal. Any changes made to items, pricing, images, SKUs or options are synced to FlexiPOS after refreshing the device.
This article explains how to:
- Link items to your FlexiPOS service
- Add images to make items easier to identify in FlexiPOS
- Use SKUs and barcodes with a scanner
- Add SKUs to item options
Linking an Item to FlexiPOS
To make an item available in FlexiPOS, you need to link it to your FlexiPOS service.
- Open the item you would like to edit by clicking on its name in your Items list.
- Locate the Services this Item Appears In section.
- Select your FlexiPOS service from the list of available services.
- Save your changes.
Once a FlexiPOS service has been selected and saved, the item will become available for sale through FlexiPOS.
Items can be linked to multiple services if required, such as your Lunch Service and FlexiPOS.

To create a brand new item please see the following article:
How to create and edit menu items
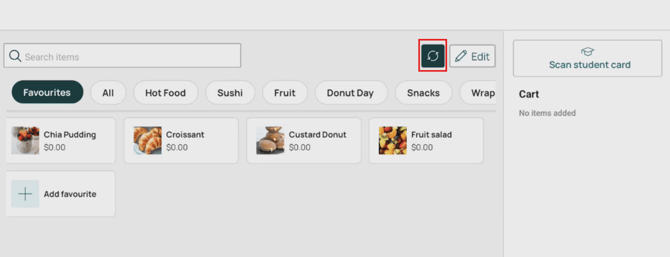
Tip! Refresh your FlexiPOS
After adding or editing an item in the Supplier Portal, press the Refresh button on your FlexiPOS device to sync the menu changes.
Adding Images to Your Items
While item images are optional, we strongly recommend adding them wherever possible.
Images are displayed to families when ordering online via the Flexischools app, but they can also make items much easier to find within FlexiPOS. Instead of having to read through item names, staff can quickly identify products visually.
This can be especially helpful during busy service periods or when training new staff members.
To add an image:
- Open the item you would like to edit.
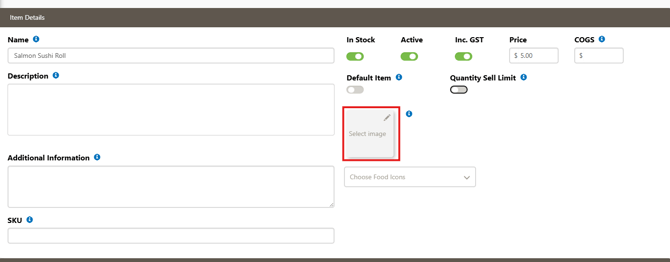
- Locate the image upload section - shown in the screenshot below.
- Click on the box and upload an image of the product.
- Save the item.
Using SKUs and Barcodes
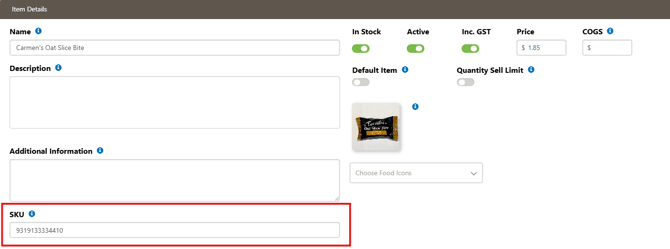
The SKU field is an optional field that allows you to scan item barcodes on the FlexiPOS, if you have a barcode scanner.
To add a SKU:
- Open the item you would like to edit.
- Locate the SKU field.
- Enter the barcode number or SKU.
- Save the item.
- Refresh the FlexiPOS to sync the change
Tip! Scan the Barcode Directly Into the SKU Field
If your barcode scanner is connected to your computer, you can enter barcodes without typing them manually.
Simply:
- Click into the SKU field.
- Scan the product barcode.
- The barcode number will automatically appear in the field.
- Save the item.
This can save time and reduce typing errors.
Adding SKUs to Item Options
If you use item options such as:
- Drink Flavours
- Item sizes
You can also store a barcode or SKU against the option.
To do this:
- Open the item you would like to edit.
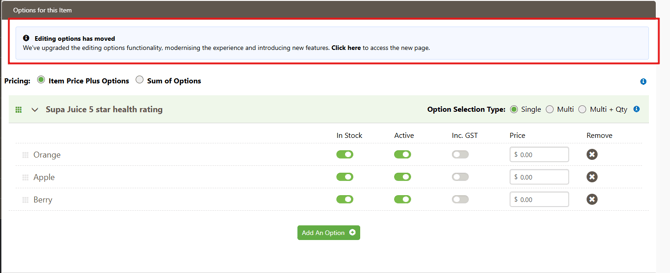
- Scroll to Options for this Item.
- Select Editing options has moved.
- Locate the option you would like to edit.
- Click the arrow to the left of the option name to expand the option settings.
- Enter the SKU or barcode number.
- Save your changes.
Editing options has moved page: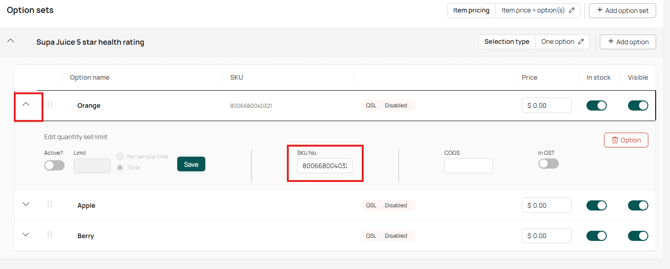
Need Help?
If you're unsure how to link items to FlexiPOS, add images, or use barcodes with a scanner, please contact our Support Team and we'll be happy to assist.
You can raise a request with our team here or give us a call on 1300 590 044.