If you need help logging in and navigating the supplier portal, please click here.
Creating a Special Food Service Webinar
Watch our Webinar All About Special Food/Event Services
Click here to see our other Webinar recordings, and to sign up for the next upcoming Webinars!
How to add a new food service
- Log in to your Supplier Portal and click ‘Services’, then 'food'.
- From the drop-down menu, click ‘Add New Service’.

If you don’t have the option to create a new service, you may not have the correct access. Please speak to your canteen manager to request access.
Service Details
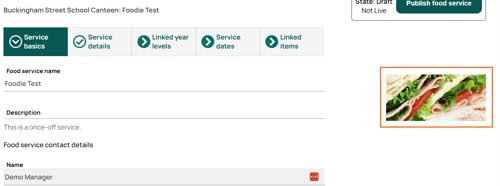
- Enter the details of your service.
- Service Description: This will show to your parents, so include any important details.
- What kind of food service is this? Select 'Once off special food service'.
- Service Contact: This is who we will contact if we need to get in touch and is not visible to parents. If you don’t see your preferred contact, select ‘The site contact I need is not listed’ and enter their details. The ‘Site Name’ is where your service will be held.
- Deposit sale funds: If your bank details are not listed, you will be prompted to complete this form. Our customer service team will then be in touch once the account has been added.
- Add an image. This will be shown to parents on the Flexischools App.
- Scroll to the bottom of the page and click ‘Create’.
- If you are adding your own image, it needs to be the following size:
1920px x 1080px (or a 16:9 ratio).
Don’t worry, you can come back at any time by clicking the 'Order Details' tab.
Linked Year Levels
In this section, you will choose who your Special Food service will be available to. Only parents with a student in the selected year level/s can place orders through Flexischools for your Service.
- Under your schools name you can select the year levels who should be able to purchase uniforms and click ‘Save and Continue’.
- If you have multiple schools/businesses showing on this page, you can select the school(s) where this service should appear.
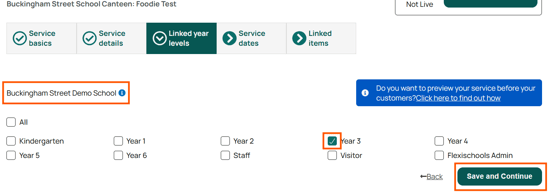
Tip! If you would like to preview your service before it becomes available to parents, link only the admin level for now. Scroll to the bottom of this page for instructions to preview.
Service Dates
- Find and select the date of your service on the calendar.
- In the pop-up, enter the below details and click ‘Save’.
- Date of Service: This is when you are providing the service to customers (i.e. the day your customer will receive their order) If your service is only being held on one day, enter the same date In the ‘From’ and ‘To’ fields.
- Service Live Date: This is the date that parents will be able to place orders through the Flexischools App.
- Scroll down to edit the ‘Service Dates and Cut-off times’. You only need to adjust the day/s your service is being held.
- Service Time: This is the time that you will be providing the service.
- Ordering Cuttoff: This is the time that the service will stop being available to parents on their Flexischools App. Enter the time and how many days prior to the service you would like parents to stop being able to place orders.
Linked Items
This will take you to your Menu, where you can create and edit Categories, Items and Options.
Linking an existing item
- Find the item and click on the name.
- Under ‘Services the Item Appears in’ use the drop box to select your service.
- Ensure you save your changes by clicking ‘save’.
- Once you have linked all items, select ‘Continue editing [your service]’ at the top of the screen.
Creating a new category
If you would like to create an item in an existing category, skip to 'Creating a new item'
- Click ‘Add Category’.
- Enter the category name and description and select an image.
- Click ‘Create’.
Creating a new item
- Find the category you would like to add your item to and click the green plus.
- Enter the name, description, and price of your item.
- If you have a limited number of items available, click the ‘Quantity Sell Limit’ toggle and enter the number of items available.
- Under ‘Services the Item Appears Under’ select your service.
- Ensure the ‘In stock’ and ‘Active’ toggles are green, scroll to the bottom and click ‘Create’.
For in-depth details on how to create an item please see the followinging articles:
How to create and edit menu items and Menu Build Gold Standards for Suppliers and Schools
Activate your Service
- Click ‘Publish Food Service’ in the top right corner. This will make your service available for any parents with children in the linked year levels.
Note: It may take up to 30 minutes for your service to be visible in the Flexischools App.
Previewing Your Service
To preview your service before releasing it to parents, only link your service to Admin in the ‘Linked Year Levels’ section and completing the following steps.
- Log in to your Flexischools account.
- Ensure you have a test student profile linked to an ‘Admin’ year level.
- Ensure that your service is active.
- You will then be able to see your special food day service on the homepage.
When you are ready for your service to go live to parents, link the relevant classes to your service by updating the ‘Linked Year Levels’ section.
Need some extra help?
If you need any assistance creating a new service, please contact our friendly Customer Support Team by calling 1300 590 044, or, by completing our contact form, which can be found here.