You can now create and manage a your next event, fundraiser or excursion service from within your Supplier Portal.
Need help logging in and navigating to the supplier portal? Click Here.
Need some inspiration?
Click here to view some recent success stories to see how the Flexischools community has made their school events, fundraisers, and excursions a breeze!
Creating a single event on Flexischools Supplier Portal Video
Watch this short video to learn how to set up a single event on the supplier portal yourself.
You can also watch our Webinar, All About Special Food/Event Services
Click here to see our other Webinar recordings, and to sign up for the next upcoming Webinars!
How to Add a New Event Service
- Log in to your Supplier Portal and click ‘Services’.
- From the drop-down menu, click ‘Add New Service’.
- Select ‘Add New Event Service’.
If you don’t have the option to create a new service, you may not have the correct access. Please speak to your canteen manager or Flexischools admin to request access. You can also request access to add new services at any time through the Forms and Requests section of the Supplier Portal.
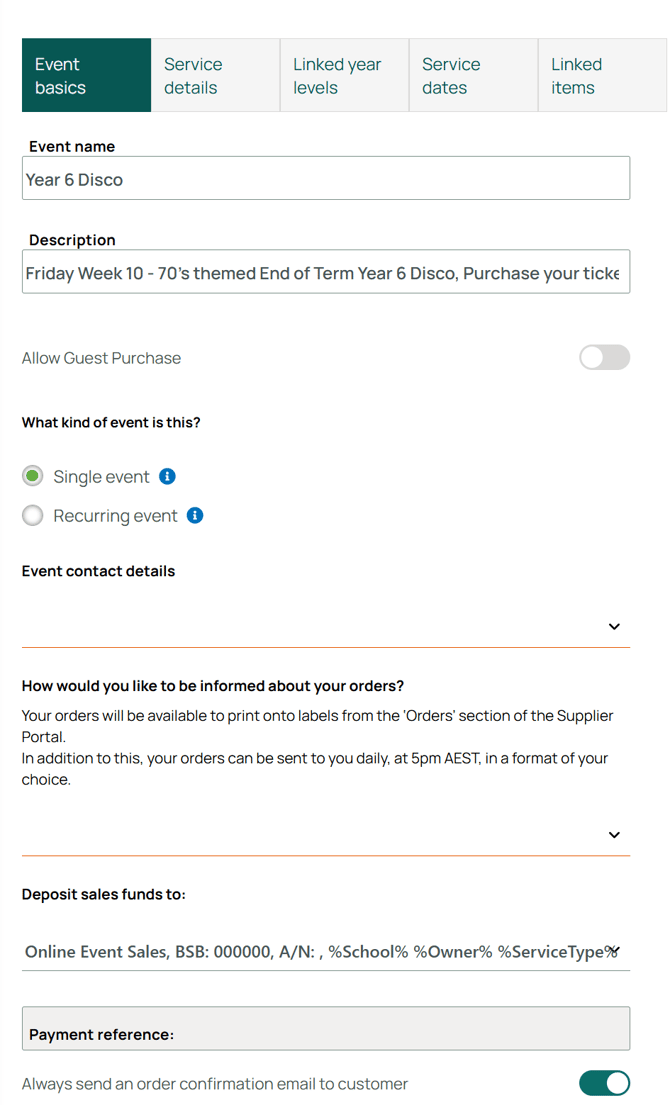
Event Basics
- Enter the details of your service.
Service Description This will show to the parents and guardians, so include any important details such as ordering deadline.
Allow Guest Purchase permits people without a Flexischools account to place orders for your event. This is helpful when friends, family members, or community supporters want to contribute but don’t have (and don’t need to create) an account.
When Allow Guest Purchase is switched on and the event is created, a shareable link becomes available while in the editing pages of your service (as shown in the screenshot below). If you hover your mouse over link icon, you can copy it to your clipboard. This link can be added to school newsletters, social media communications and on printed fliers - where you can use a QR code generator to create a scanable image that will direct straight to the service.If a parent or guardian with a Flexischools account opens the guest link, they’ll be redirected to log in and order through their own account instead. This ensures their order is stored correctly against their profile.
What kind of event is this? Event Services can be set up for a one‑off occasion or for events that run across multiple dates.
a. A Single Event Choose this option if your event will be held for one specific day. e.g. A one‑off celebration or themed day, disco or special fundraising event.
b. Recurring Event Choose this option if your event runs over multiple dates such as a book week activities, consecutive day excursions, or sports carnivals held over several days.
Service Contact This is who we contact if we need more information. It will not be visible to parents, but email and phone number may be provided upon request in the event they need to cancel an order or speak directly with the event contact. Emergency contact number is never provided to parents.
If your preferred contact isn’t listed, choose ‘The site contact I need is not listed’ and add their details.
The ‘Site Name’ should be the name of your school and event, for example: Fairlight Central School Events, and 'Site Address' should be the location of your school/event.
How would you like to be informed about your orders? Your orders will always be available to view and print from the ‘Orders’ section of the Supplier Portal.
In addition to this, you can choose to receive a daily email summary of your orders around 5pm AEST. You can select from the following formats:
a. I only need labels Choose this option if you prefer to view order details directly in the portal and only need printable packing labels emailed to you each day.b. I'd like my orders emailed to me in a daily spreadsheet This option provides a simple daily spreadsheet that lists all orders made that day. You will still be able to print labels if you wish. It’s useful for quick overviews, stock checks, or tallying quantities.
c. I'd like my orders emailed to me daily in a page‑per‑order format (order confirmation + tax invoice) This format sends one page per order, including full order details, customer information and a tax invoice.
This option is recommended for Uniform Shops because it allows you to print each order individually along with a tax invoice. This makes it easy to attach the printed invoice to the correct bag or bundle and streamline packing and collection.
Tip! Choosing “I’d like my orders emailed to me in a daily spreadsheet” automatically locks in the day’s orders at the time the spreadsheet is sent. This prevents any cancellations after that point, helping you keep accurate records and avoid last‑minute changes, otherwise, orders are locked once printed.
Deposit sale funds If your bank details are not listed, you will be prompted to complete this form. Our customer service team will then be in touch once the account has been added.
What kind of shop service is this? Uniform Shops often operate year‑round, but you can choose to set permanent availability, or restrict ordering to certain dates (e.g. seasonal uniforms)
a, A once off/special shop service Choose this option if your shop is only available for a limited time or for a specific purpose. e.g. A Senior Shirt Service that is only available for a limited time or seasonal uniforms.
school newsletters
b. An ongoing Shop Service Choose this option if your Uniform Shop is open regularly, such as every week or year‑round.
Add an Image Upload a product image or a uniform shop banner that will appear to parents in the Flexischools App. To do this, click on the grey image box on the right‑hand side of the page (labelled “No image selected”). You will then be prompted to select and upload an image from your device or choose from the available images provided..png?width=583&height=356&name=Supplier%20Portal%20Screenshots%20(2).png)
Scroll to the bottom of the page and click ‘Create’.
Don’t worry, you can come back at any time and change these details by clicking the pencil in the active bar of your service.
Linked Year Levels
In this section, you will choose who your event will be available to. Only parents with a student in the selected year level/s can place orders through Flexischools for your event.
- Under your schools name you can select the year levels who should be able to purchase from your event and click ‘Save and Continue’.
- If you have multiple schools/businesses showing on this page, you can select the school(s) where this service should appear.
.png?width=583&height=356&name=Supplier%20Portal%20Screenshots%20(3).png)
Tip! If you would like to preview your event before it becomes available to parents, link only the admin level for now. Scroll to the bottom of this page for instructions to preview your event.
Service Dates
- Find and select the date of your event on the calendar.
- In the pop-up, enter the below details and click ‘Save’.
Date of Service: This is when your event will be held. If your event is only being held on one day, enter the same date In the ‘From’ and ‘To’ fields.
Ordering Start Date: This is the date that parents will be able to place orders for your event through the Flexischools App.
- Scroll down to edit the ‘Service Dates and Cut-off times’. You only need to adjust the day(s) of the week your event is being held.
Service Time This is the time that your event will run.
Ordering Cutoff This is the time that the event will stop being available to parents on their Flexischools App. Enter the time and how many days prior to the event you would like parents to stop being able to place orders.
.png?width=583&height=356&name=Supplier%20Portal%20Screenshots%20(5).png)
Linked Items
This will take you to your Menu, where you can create and edit Categories, Items and Options.
Linking an existing item
- Locate the item in the "items" then "events" tabs, and click on the item name.
- Under ‘Services the Item Appears in’ use the drop box to select your event service.
- Ensure you save your changes by clicking ‘save’.
Creating a new category
If you would like to create an item in an existing category, skip to 'Creating a new item'
- Click ‘Add Category’.
- Enter the category name and description and select an image.
- Click ‘Create’.
.png?width=475&height=263&name=Supplier%20Portal%20Screenshots%20(6).png)
Creating a new item
- Find the category you would like to add your item to and click on the 'green plus’ icon.

Enter the name, description, and price of your item. - You can upload an image of the product to help parents identify exactly what they’re ordering.
The image displays alongside the item name in the uniform shop catalogue - Quantity Sell Limit can be enabled should you wish to restrict how many of this item can be purchased. Two options are available:
Per Service Time: means that for each service that the item is linked to, ie Uniform shop and Winter Uniforms. the QSL limit applies separately for each service and resets every day that service occurs.
Total: This option places a fixed overall limit across all services.
Once the total limit is reached, the item will remain at 0 available until you manually reset it.
If no limit is needed, field can be turned off. - Under ‘Services the Item Appears In’ select your service
Items can be linked to multiple services.
Once selected, the item becomes linked and will appear for ordering in that service. Items can be linked to multiple services. - Scroll down and click create, which will then allow you to add options to the item.
Click here for more information about creating and managing options.
Activate your Event
- Click ‘Publish Event’ in the top right corner. This will make your event available for any parents with children in the linked year level.
.png?width=475&height=127&name=Supplier%20Portal%20Screenshots%20(7).png)
Note: It may take up to 30 minutes for your service to be visible in the Flexischools App.
Previewing Your Event
To preview your service before releasing it to parents, only link your service to Admin in the 'Linked year levels section' of your event and complete the following steps.
- Log in to your Flexischools account.
- Ensure you have a test student profile linked to an ‘Admin’ year level.
- Ensure that your event service is active.
- Your service should appear on the home page of your Flexischools account. Click on the event to begin placing an order.
When you are ready for your event service to go live to parents, link the relevant classes to your service by updating the ‘Linked Year Levels’ section.
Need some extra help?
If you need any assistance creating a new event service, please contact our friendly Customer Support Team by calling 1300 590 044, or, by completing our contact form, which can be found here.
Download a PDF version of our How to Create an Event Service Guide here