This article explains how to set up and use the Label Rewinder and Label Peeler.
These add‑ons are commonly used during medium‑ to high‑volume label printing to improve operational efficiency and organisation of labels.
-
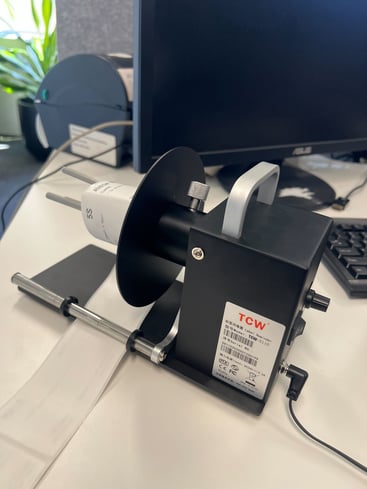
Automatic Label Rewinder/Unwinder TCW‑X110
link to buy: https://www.aliexpress.com/item/1005008468442134.html?spm=a2g0o.order_list.order_list_main.5.1ab01802T3M3Cw Includes demo videoPrice: $69.39
-
Label Peeler
Link to Buy: https://www.aliexpress.com/item/1005009465250862.html?spm=a2g0o.order_list.order_list_main.11.1ab01802T3M3Cw Includes demo video and shows how to set up
Price: $144
1. Label Rewinder
A label rewinder winds printed labels into a roll as they exit the printer, allowing labels to remain organised during large print runs.
It operates independently from the printer and does not require software or driver configuration.
The TCW-X110 is speed adjustable and can be tuned to match the printer's out put speed. It is also bidirectional, allowing you to rewind labels onto the spindle or unwind labels off of it.
Rewinder Setup
Step 1: Position the Rewinder
-
Place the rewinder in front of or the printer, where the labels come out of
-
Align the rewinder spindle with the printer’s label exit path
-
Ensure both devices are on a stable, flat surface
What is the rewinder spindle?
The rewinder spindle is the rotating central shaft on the label rewinder that the labels are wound onto/wraped around as they exit the printer.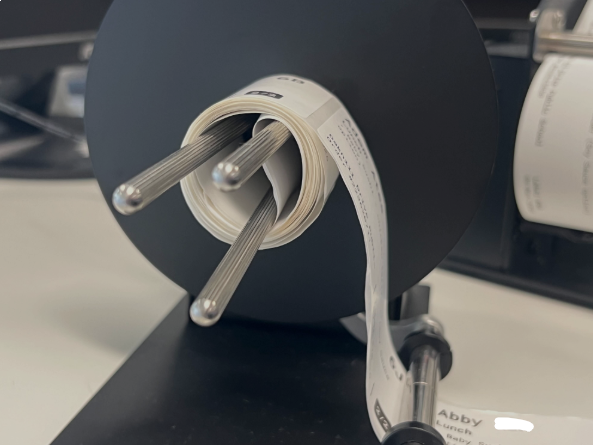
Step 2: Thread the Labels onto the label rewinder
- Feed some blank labels out of the label printer so that these can be fitted to the rewinder before you print your batch of labels
-
Guide the labels under the guide arm
The guide arm helps the rewinder detect tension.
The guide arm helps the rewinder detect label movement and tension. It is a movable metal arm on the label rewinder, and labels must pass underneath it for correct operation. When the printer pauses, the labels tighten and lift the guide arm, signalling the rewinder to stop turning. This prevents over‑winding and helps ensure labels are wound evenly. - Place the labels onto the spindle.
The spindle has three prongs and best results are achieved by feeding the labels through the prongs (see video below)
Incorrect threading may cause the rewinder to stop working correctly or result in uneven winding.
Step 3: Power, Direction and Speed
-
Connect the power adaptor
-
Turn the rewinder ON
-
Set the direction switch:
-
Forward – standard winding onto the spindle
-
Reverse – unwinding off the spindle or correcting alignment
-
Speed Dial
- Adjust the speed dial to your desired speed.
The dial controls rewinder speed only and does not affect printer print speed. This can help determine how tightly labels are wound
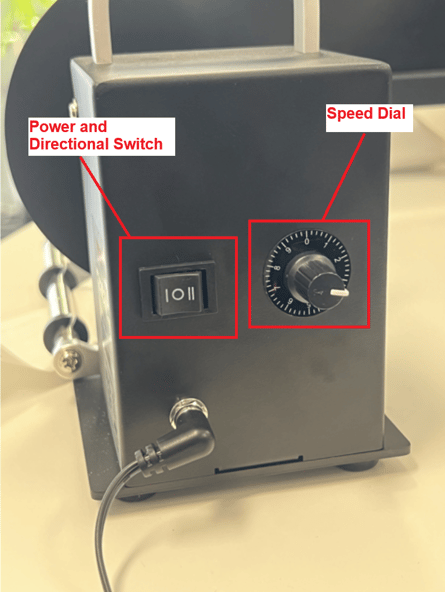
- The switch in this image is the power switch and the directional switch.
-
Double‑line icon: unwind from the spindle mode
- Single line icon: rewind onto the spindle mode
Step 4: Remove labels off the spindle
-
Once all labels are wound onto the spindle, loosen the spindle adjuster. This reduces the spindle size, allowing the label roll to be removed easily.
 * Labels will usually be facing up when in use with the label printer
Best practice and tips
-
Start on a low speed
-
Increase gradually until winding is even and speed matches the printer output
-
Avoid excessive tension to prevent label curling
2. Label Peeler
Label Peeler Setup
Step-by‑step
When using the label peeler, the goal is to force the label and the backing to take different paths, which causes the label to separate cleanly from the backing, allowing for easy application onto lunch bags and products.
Step 1: Prepare the labels
- Labels exit the printer as normal
- If you have a label rewinder, you can first rewind the labels into a roll and place that roll onto the label peeler's holder.
- If you are not using a rewinder, ensure the label strip is supported (for example, wrap it tightly in a roll, and then place it on the label peeler's holder) so it can feed smoothly without pulling or sagging.
This helps maintain consistent tension when peeling.
The image below shows the labels wound into a roll (using a label rewinder in this example) and placed onto the label peeler’s holder.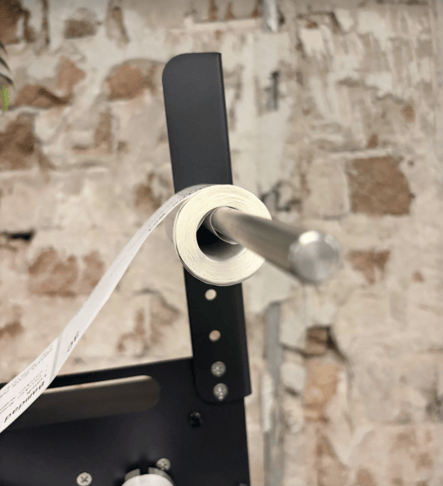
Once placed onto the holder, secure the metal plate tightly against the label roll using the wing nut. The metal plate sits against the side of the label roll to hold it firmly in place and keep the labels feeding straight.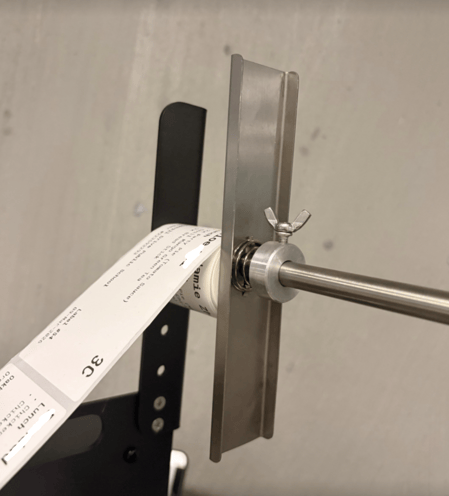
Step 2: Route the labels and backing around the peeler bar
- Feed the strip of labels forward from where it is wrapped on the holder bar, until it reaches the metal peeler bar
- From here, you can manually peel the labels until you have a strip of the empty backing, which can than be fed:
- Under the upper metal guide rod and through the peeler bar,
- and back around under the peeler bar and above the lower metal rod
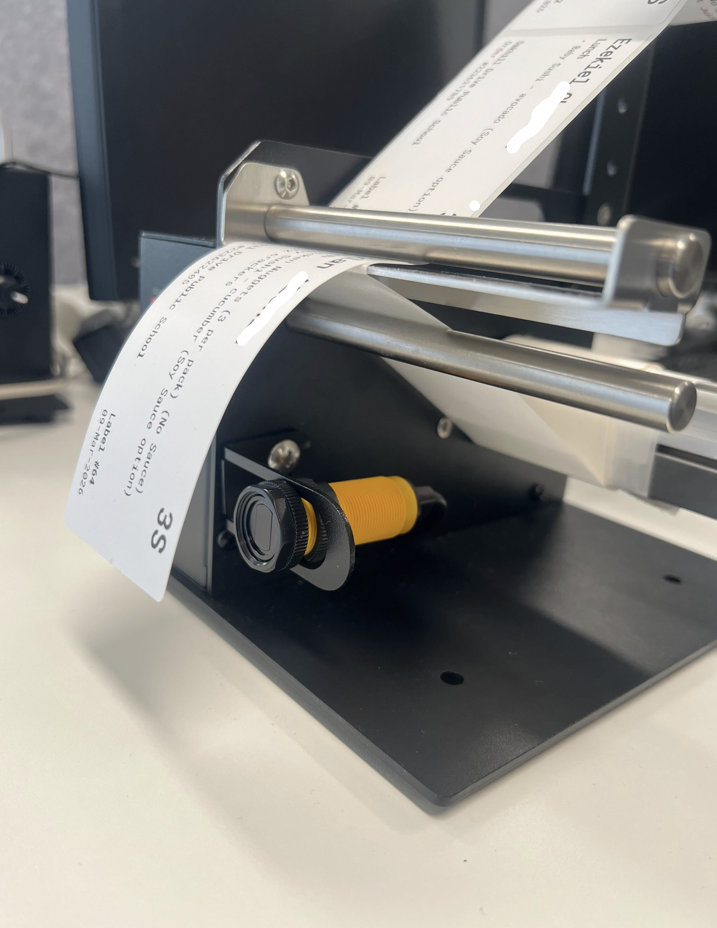
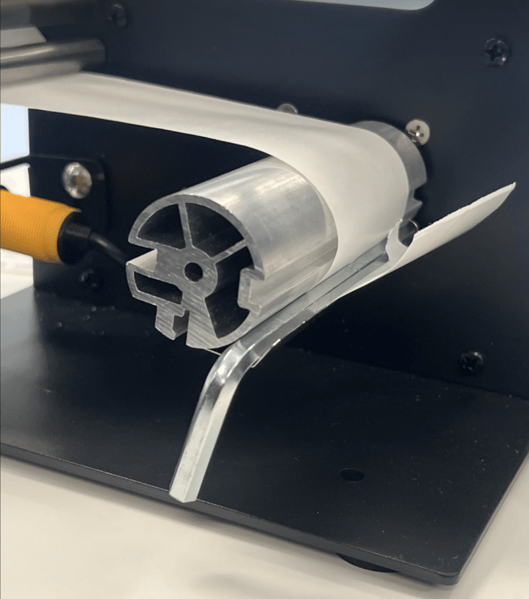
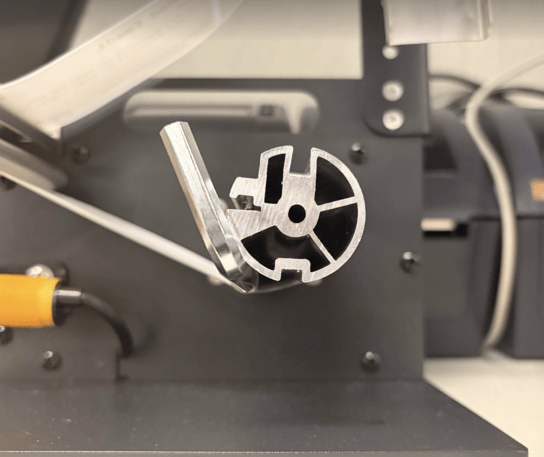
If the backing is not routed correctly or there is not enough tension, labels will not peel reliably.
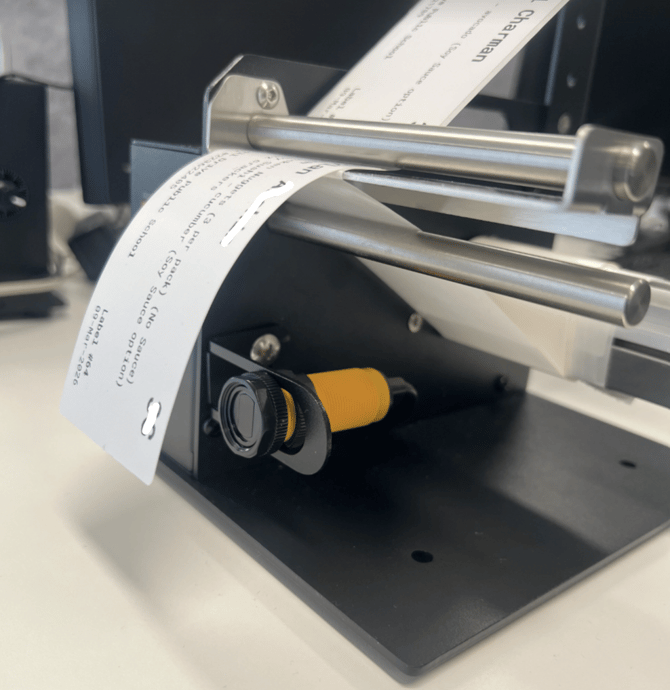
Label Sensor Orientation (Important for Peeling)
Correct positioning of the label sensor is essential for proper stopping, feeding, and peeling of labels.
The label peeler works one label at a time. When a label reaches the sensor, the peeler pauses and holds the label in place. Once you remove the peeled label, the sensor detects that it is clear and feeds the next label forward automatically. This allows labels to dispense at the same pace they are being picked up.
If the sensor is not aligned correctly, you may experience:
-
Skipped label
-
Continuous feeding
-
Labels not stopping in the correct peel position
Always check and adjust the sensor alignment if labels are not peeling correctly.
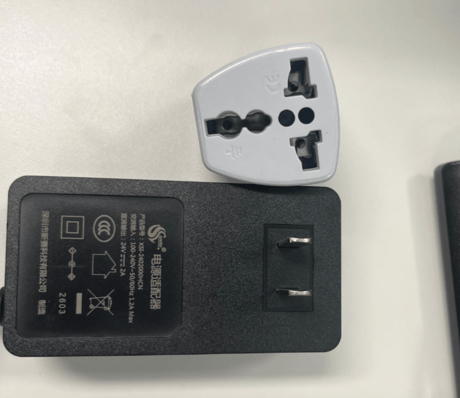
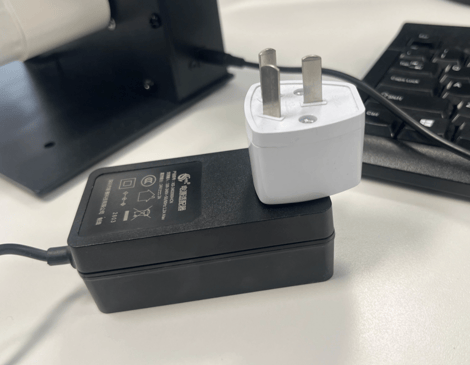
Power Plug Requirements for both the label peeler and label rewinder
Both the label peeler and label rewinder are supplied with a US (Type A) power plug, which is not compatible with Australian power points. A US‑to‑AU (Type I) plug adapter is required to use the device.